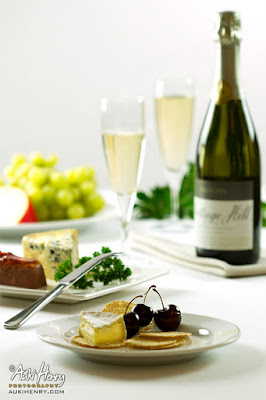
photography food The final shot. Read the article for how easy it was to actually set up. With the holiday season bringing me some sp...
photography food
With the holiday season bringing me some spare time recently I have found myself interested in browsing photography portfolios in genres that I do not usually have time to indulge in, one in particular being food.
It's almost a perfect fit for me when I think about it really, I mean I love food, I love looking at food (and eating it obviously), I love watching it being made, prepared and presented so why not give it a shot?
As with anything to do with video or photography, there are techniques that have been tried, tested and are known to work. Google is a great place to start reading up about some of these techniques so that is exactly what I did.
I am a great believer in not just following 'the rules' blindly though, they may help you technically, they may help you save some time but in the end if all you are doing is following a set of pre made 'rules' someone else came up with then you are not learning much about your own photography and creativity.
If I took anything in particular away from my reading to experiment with, it was just a few very basic but relatively important things that help to give a food picture that 'look' that you come to expect in a nice bright brochure or a cookbook, and this is probably all you need to give it a try for yourself.
A Simple Food Photo Setup
The above photo was taken using just a couple of very basic techniques, below is a quick run down of how I set up the photo. This is just my way of doing it, there are a ton of techniques out there and half the fun is finding what works best for you and just taking photos! Hopefully you might find something here to help you with your own experimentation though.
 No tricks or expensive equipment to see here, this is our old breakfast table, as long as it's flat and can hold the weight of whatever you are taking a picture of then you're already half way there.
I suppose even the floor would do, but lets go for something that will give me a bit more room to move around with the camera. The set doesn't look much like the final photo yet though so read on . . .
 When I had the shot idea in my head I wanted something high key and on a nice heavy white table cloth like the ones you get at fancy hotels. I don't have anything like that but I did have an old muslin backdrop that I used to use for shoots. White sheets could have done the same job if you aren't lucky enough to have one of those heavy expensive tablecloths. The backdrop stand has been set up so I can drape part of the muslin over to give me a nice white 'wall' to the scene.
 Muslin backdrops crease REALLY easily and are a bit of a pain in the proverbial to keep straight. When they are just being used as an out of focus backdrop for portraiture this isn't much of an issue, especially if you can wash it out with strobes, but we're going for close up here, and at least part of our 'table cloth' will be in focus where the main food subject is sitting. A steaming iron was definitely my friend for this.
 That's the presentation surfaces of the set complete now. Anything likely to be in focus has been meticulously ironed out and is super flat, or as flat as I could make it anyway. You may notice the backdrop hanging over the stand is not ironed however, the reason being that with the focal length and aperture I plan on using it will be a big blur anyway. On a lazy Sunday afternoon shoot like this I am not likely to want to do more ironing than is absolutely necessary.
 I do not have a window that gets good directional light from the sun anywhere in my place unfortunately so I have opted to use a couple of continuous lights for my light sources. The softbox on the left is my main light for the scene. This part of the setup I prefer to do with all other light sources off as I find it easier to see where shadows will fall and how much of the area that will be in view is lit. Remember rear lighting is good for food photography.
 Placing the props is the stage where you really start getting a feel for how your photo might look, surprisingly this actually takes the most time out of the whole process (for me anyway). A professional food photographer will probably have a dedicated food stylist for this part . . . did I mention I am not a professional food photographer? So no stylist for me! This pic is a good example of watching the fall of shadows from your main light.
 This is just to demonstrate the tip I mentioned earlier about arranging the food for the lens you will be using. From this side angle the food is arranged almost all the way down the length of the table, you wouldn't set a table like this for your friends, they'd probably think you'd hit the champagne early, but for the angle we are taking the photo from and the focal length (in this case 100mm) it works. You should test and adjust many times till it looks right to you.
 Here's the final setup ready to be photographed. Main light is the continuous softbox on the left, on the right side is another continuous light slightly higher up and not angled directly at the food, it is mostly there for ambient light but also gives any shiny surfaces another highlight for extra dimension. I also have a Vivitar flash through a grid setup (and a slight bit of diffuse material) just to give a bounce off the backdrop and brighten it up a bit.
As you can see none of this was particularly hard to set up and it used just very basic techniques, the biggest cost is taking the time to set it all up. Why not give it a try yourself, practice makes perfect and you will have heaps of fun in the process, not to mention the pleasure of eating your props when you finish (if you use real edible food product that is).

 |
| The final shot. Read the article for how easy it was to actually set up. |
It's almost a perfect fit for me when I think about it really, I mean I love food, I love looking at food (and eating it obviously), I love watching it being made, prepared and presented so why not give it a shot?
As with anything to do with video or photography, there are techniques that have been tried, tested and are known to work. Google is a great place to start reading up about some of these techniques so that is exactly what I did.
I am a great believer in not just following 'the rules' blindly though, they may help you technically, they may help you save some time but in the end if all you are doing is following a set of pre made 'rules' someone else came up with then you are not learning much about your own photography and creativity.
If I took anything in particular away from my reading to experiment with, it was just a few very basic but relatively important things that help to give a food picture that 'look' that you come to expect in a nice bright brochure or a cookbook, and this is probably all you need to give it a try for yourself.
- Don't use front lighting or a flash like in portrait photography, this tends to wash out the texture and detail of the food. With food, texture is good.
- Use side lighting to highlight your subject and give it depth in your composition.
- Rear lighting works well, natural light (eg. the Sun) works well too although you may not always be in a position to use it.
- If you have them, small mirrors can be used to reflect the main light back onto particular parts of your scene to help parts of it stand out and reduce too much shadow.
- Make sure any food that is going to be in focus is fresh and looks good!
- Arrange the composition for the particular lens you are using, take a test shot and re-arrange as many times as needed, the arrangement on the table will probably not look right for a dinner setting but it should look right to your focal length.
The above photo was taken using just a couple of very basic techniques, below is a quick run down of how I set up the photo. This is just my way of doing it, there are a ton of techniques out there and half the fun is finding what works best for you and just taking photos! Hopefully you might find something here to help you with your own experimentation though.
THE HIGH TECH STUDIO ( AKA the breakfast table )

I suppose even the floor would do, but lets go for something that will give me a bit more room to move around with the camera. The set doesn't look much like the final photo yet though so read on . . .
DRESSING THE SET

MAKE IT NEAT

FINISHING THE BASIC SET

SET UP YOUR BASE LIGHTING

ARRANGING THE PROPS

ANOTHER PERSPECTIVE

READY TO TAKE THE SHOT

As you can see none of this was particularly hard to set up and it used just very basic techniques, the biggest cost is taking the time to set it all up. Why not give it a try yourself, practice makes perfect and you will have heaps of fun in the process, not to mention the pleasure of eating your props when you finish (if you use real edible food product that is).
THE END PRODUCT


Nice work, what sort of stands and softboxes do you use? any brand in particular
ReplyDeleteThanks catcha, im just using generic ebay cheapies for food pics. Similar to these but mine are only 4 head not 10 : http://www.ebay.com.au/itm/Photography-Photo-Studio-Softbox-Continuous-Video-Light-Lighting-Kit-VL-9026S-/140630409157?pt=AU_Cameras_Photographic_Accessories&hash=item20be39bfc5#ht_5201wt_952
ReplyDeleteHenry, thanks for the informative blog. It was really useful to me, as in knowing the basics and the little detailing. This detailed explanation has made me realize the mistakes i have been doing as an amateur, thanks for sharing your ideas very clearly. Appreciate it.
ReplyDeleteThank you for the feedback Harry Max, I'm glad I could help somebody with a few tips :)
ReplyDelete